Help

User Interface Guide

Help

For any topic you can't find here, you can reach out to us through our support page.

Common Questions

In this section, you can find the answers to frequently asked questions.

Localizing applications into multiple languages and updating these localizations when new versions are released is a laborious and costly task. Auto Localize aims to simplify this cumbersome process and provide a more cost-effective solution. Firstly, it supports localization resources specific to many development languages and in different formats. With its PRO features, it utilizes GPT technology to enable the entire project to be localized automatically with a single click.

The basic steps to use Auto Localize are as follows:

  1. Create a new localization project.
  2. In the opened project screen, give your project a name.
  3. Select the default language value. This indicates the main language in which your application was developed.
  4. If there are texts you don't want to be localized (like the name of your application, special names, brand names, etc.), add them to the "Texts not to be localized" section.
  5. After completing the entry of information related to your localization project, use the add button on the toolbar to add the files or folders containing the files you want to be localized.
  6. The application will automatically scan the folders and files you added and identify the items that need to be localized.
  7. In the project navigation section on the left, you can select folders and files to open the localization screen.
  8. On the localization screen, you can manually localize by changing the target texts of the items you want.
  9. If you wish, you can press the Localize button on the toolbar to automatically localize all the items on the active localization screen. Automatic localization is a PRO version feature and requires a subscription.
  10. If you wish, you can use the filtering box on the localization screen to filter items.
  11. After completing all the necessary localization processes, save your project.

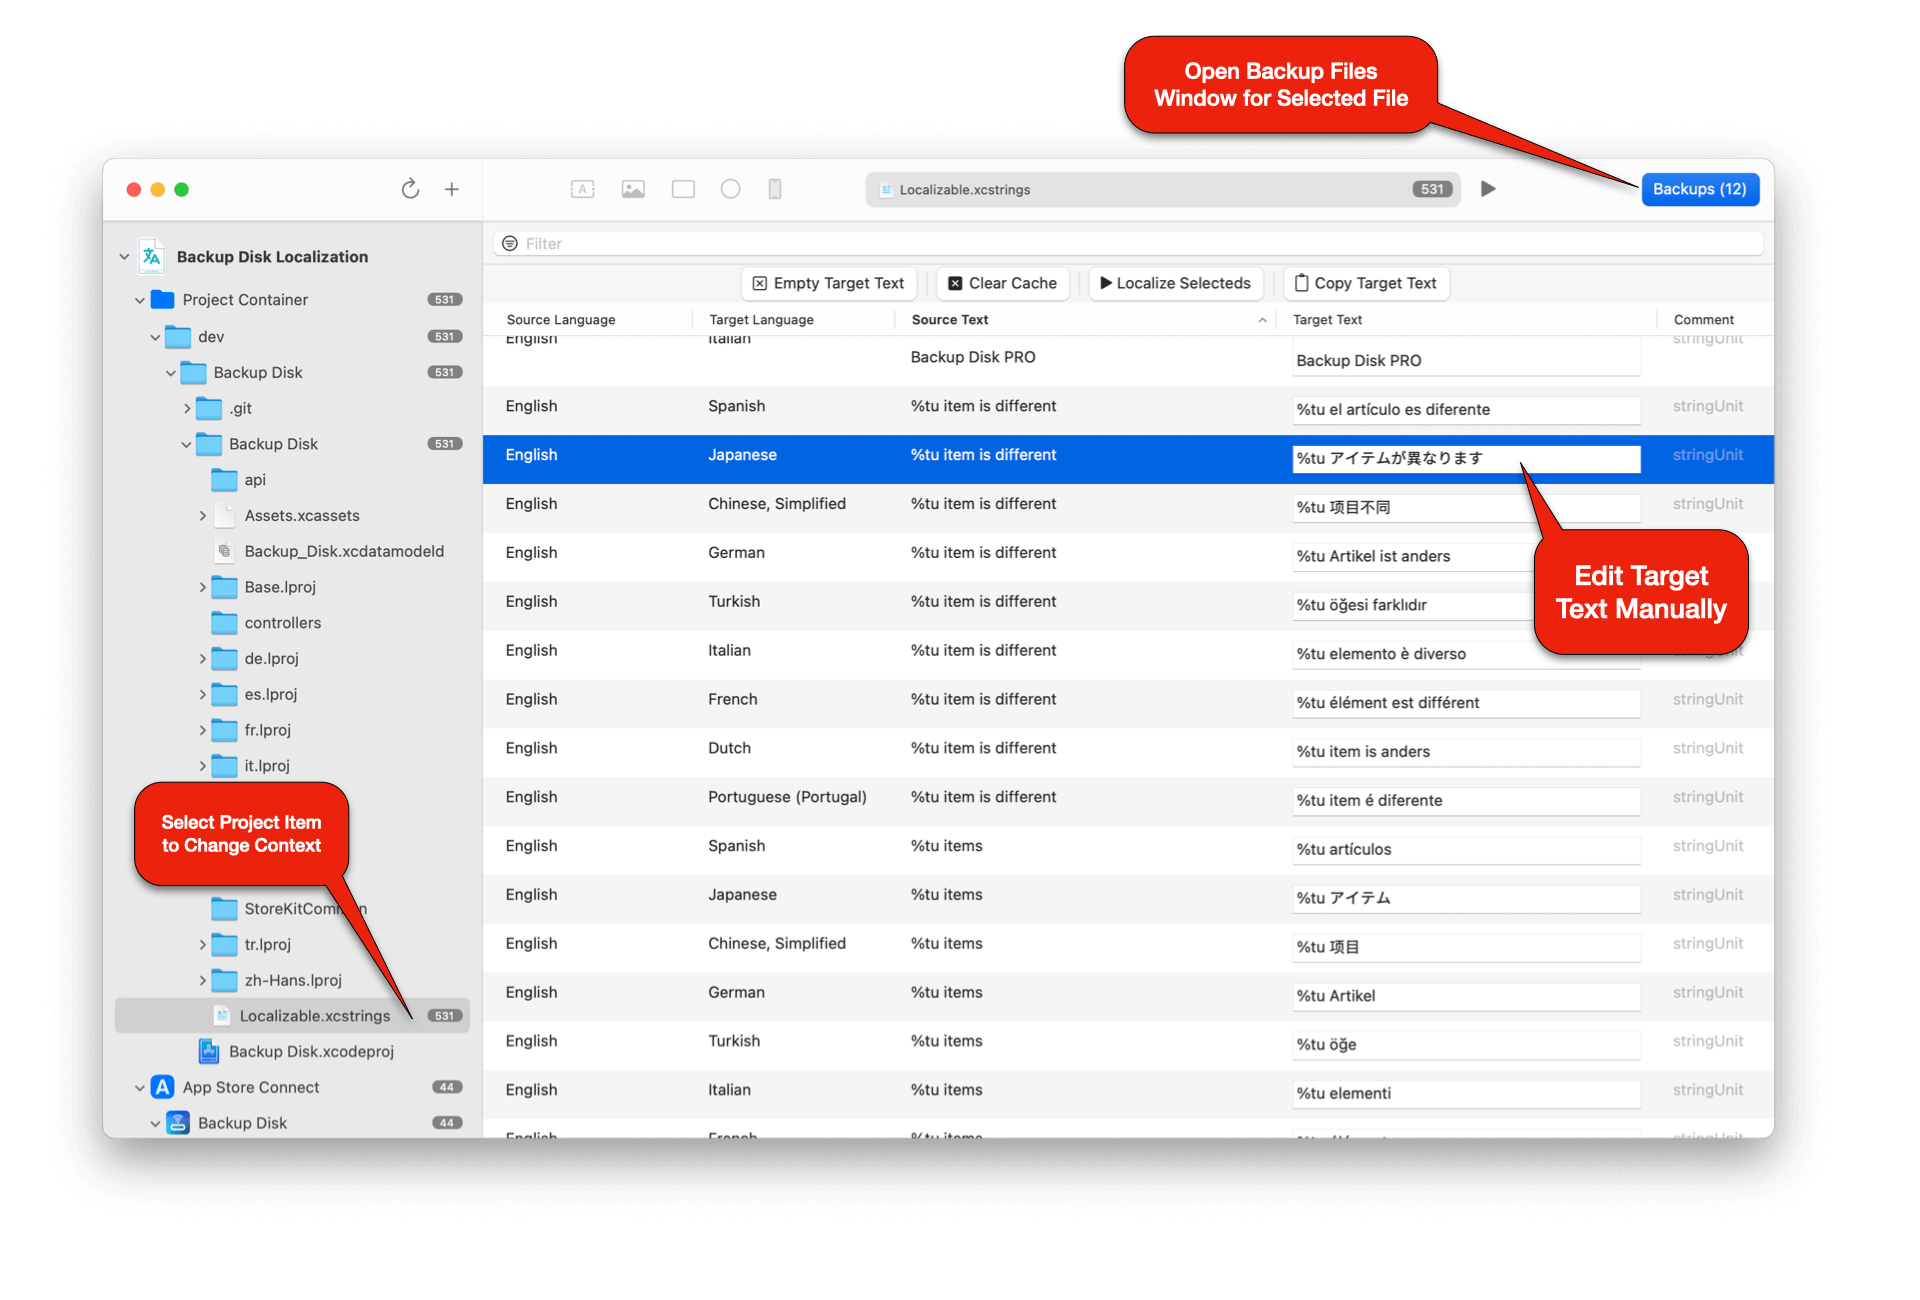
Yes, XLIFF files are among the primary files supported by Auto Localize. The most commonly used formats, Version 1.2 and Version 2.0, are supported.

With Auto Localize, you can directly open and edit XLIFF and XCLOC files because these formats contain all the necessary information for localization.

In addition, the application supports file types commonly used for localization in programming languages, such as XML, JSON, ARB, STRINGS, RESX, and PROPERTIES. Since these file formats do not contain all the necessary information for localization, they cannot be opened directly. However, the project folders they are located in can be opened with Auto Localize. The application, by examining the project structure, automatically identifies the items to be localized and determines the source and target languages, facilitating the localization of these files. For detailed information, please review the programming languages section in the help page.

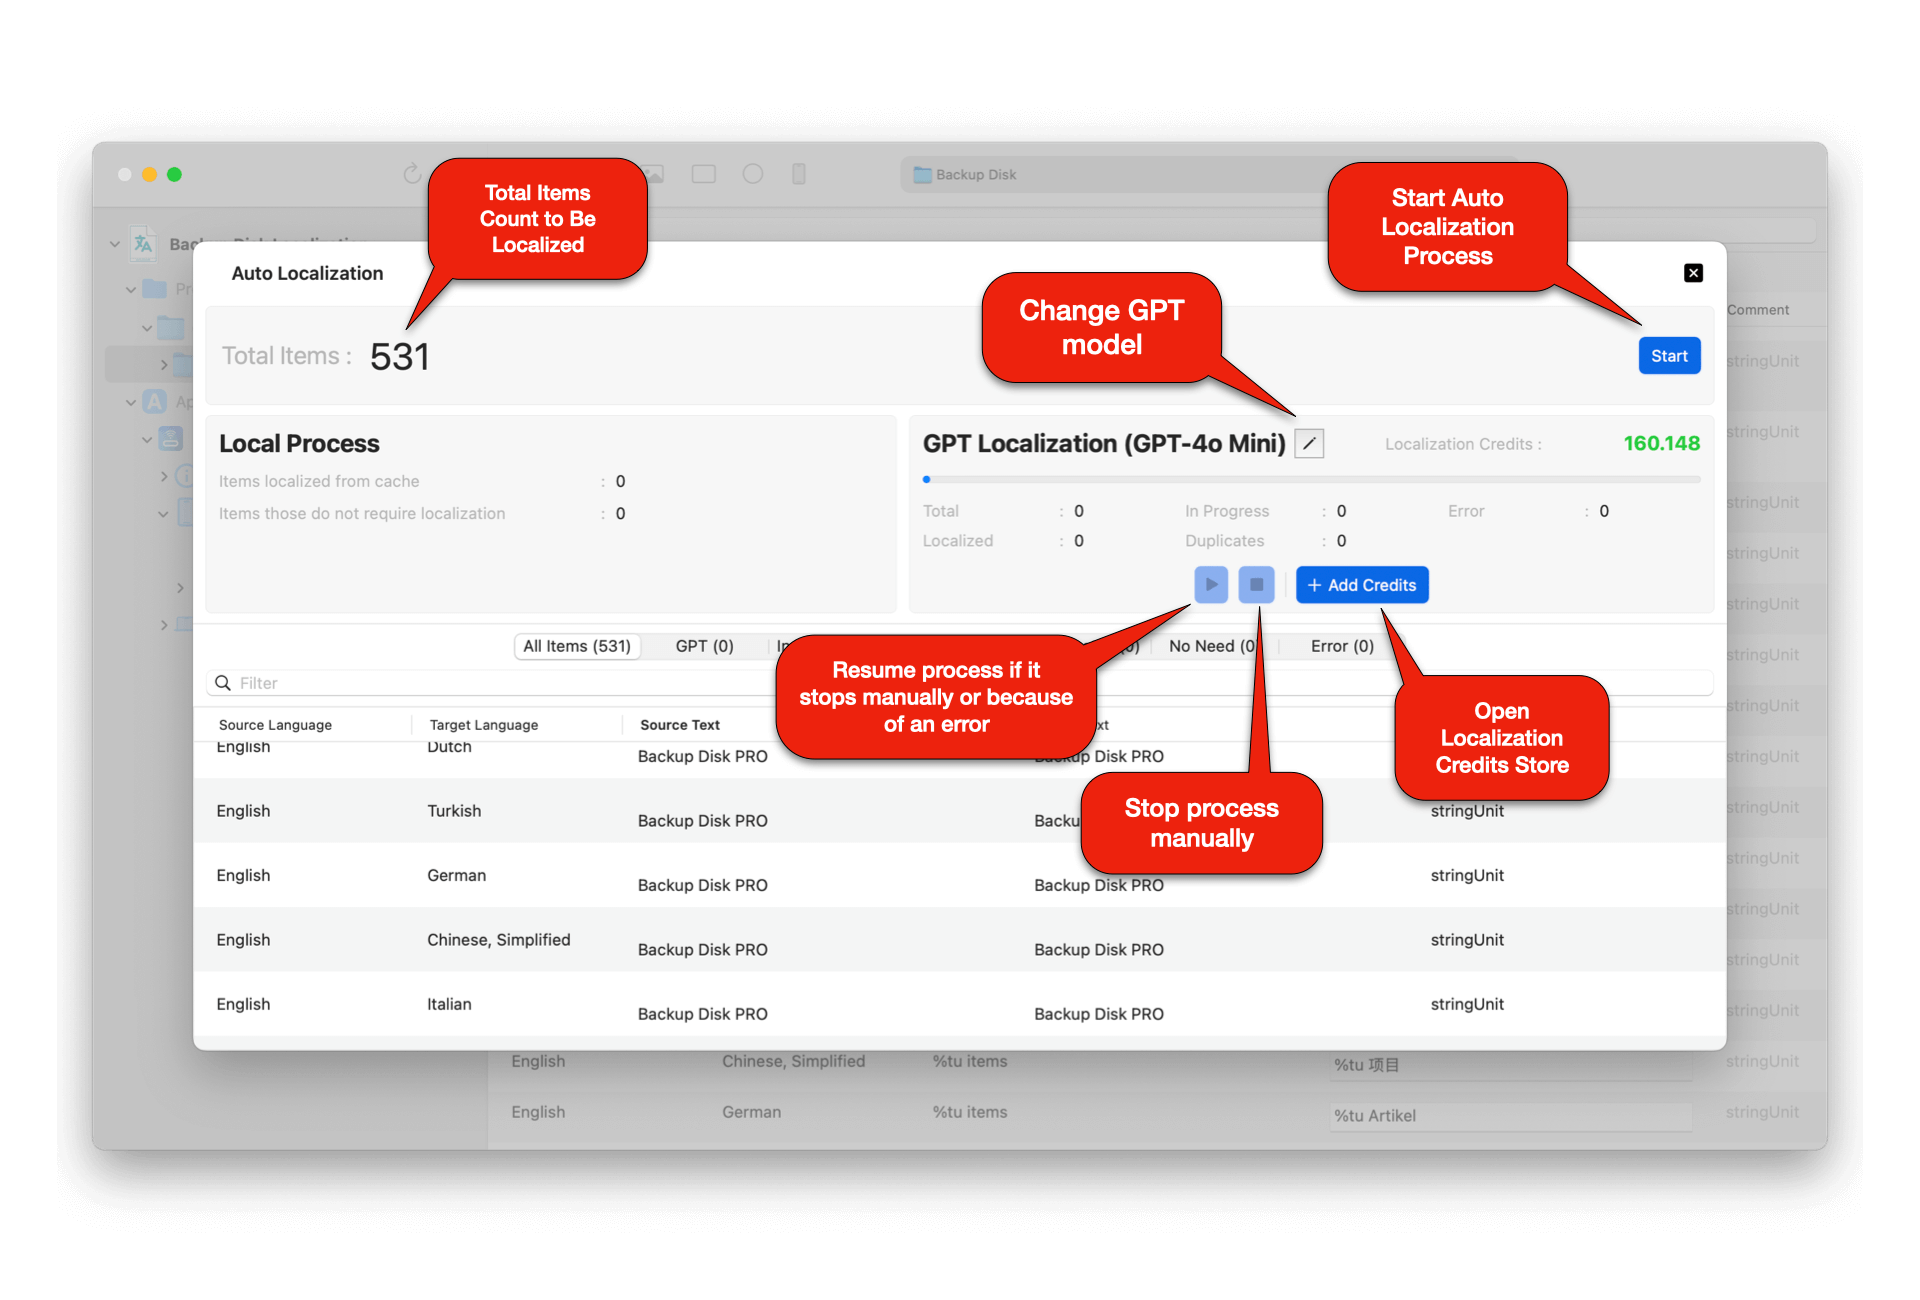
The Auto Localize is a free editor application that you can download and manually edit your localization files without paying any fees. However, it also has features defined as the PRO version, which require a paid subscription to activate. These features include automatic localization using the OpenAI GPT API, caching, and multi-item localization.

Activating the PRO feature requires a paid monthly subscription. For every active month of your subscription, 10,000 free localization credits are added to your account. With every localization action you take using the GPT service, a certain amount is deducted from your credits based on the size of the localized items. Once you run out of credits, you cannot use the GPT localization service.

When your localization credits run out, you can purchase credit packages from the Localization Credit Store within the application. Another option is to wait for the next month's PRO subscription renewal to receive the upcoming localization credits.

No, the localization credits that come with your PRO subscription every month or those you purchase from the credit store never expire. In fact, if you cancel your subscription and reactivate it later, your old unused credits will still be waiting for you.

Unfortunately, no. The GPT localization service is a PRO version feature. You cannot use this service when your PRO subscription is not active.

The application has a caching feature. Before localizing any item, the application first checks the cache in its database. If a previous localization for the item exists in the cache, the cached values are used directly. For values not found in the cache, the GPT localization service is invoked. The returned response is written to the cache, ensuring the GPT service is never used again for the same item, preventing unnecessary consumption of localization credits. The cache is structured based on the trio: 'source language, target language, and source text'. Additionally, when an item is manually localized, the cache is updated with the value you provided.

Programming Languages

In this section, it is explained how Auto Localize can be used to localize applications developed in different programming languages.

Firstly, you need to activate localization in your project. You can find the necessary information about this at the link below.

https://developer.apple.com/documentation/xcode/adding-support-for-languages-and-regions#

After activating localization in your project, you can use the 'Product -> Export Localizations' menu in XCode to export your localization files to a folder of your choice.

https://developer.apple.com/documentation/xcode/exporting-localizations

Depending on the version of XCode you are using and the languages you specified when activating localization, XCode will create localization files in either XCLOC or XLIFF format. From this point on, open Auto Localize and create a new project. Then, add the folder where you exported the localization files to this project using the 'Add Folder' option. Auto Localize will automatically scan all the files and identify the items that need to be localized. You can then press the localization button on the toolbar to automatically localize all the files.

After that, press the save button and use the 'Product -> Import Localizations' menu in XCode to import the localized files back into your XCode project.

https://developer.apple.com/documentation/xcode/importing-localizations

This way, you can localize your project into many languages within minutes.

In Java projects, localization is usually done through '.properties' files held under the 'Resource Bundle'. After adding the languages you want to localize to your project, '.properties' files for each language will be created under the 'Resource Bundle'. The process might vary depending on the IDE you are using.

After creating the localization files, open Auto Localize. Create a new project. Then, add your project folder, which also contains the localization files, to this project using the 'Add Folder' option. At this point, it's crucial to ensure the accuracy of the 'Default Language' you select in Auto Localize, as the source language for the '.properties' files will be determined based on this field. After adding the folder, Auto Localize will automatically scan all the files and identify the items that need to be localized. You can then press the localization button on the toolbar to automatically localize all the files. After hitting the save button, all your '.properties' files will contain the localized translations.

*IMPORTANT NOTE: Auto Localize does not touch any files in your project other than your '.properties' files. However, it's always recommended to work with backups.

In projects developed with Android Studio, localization is typically done through the 'strings.xml' files located under your 'resource' folder. You can find the details of the adjustments you need to make in your project for localization at the link below.

https://developer.android.com/guide/topics/resources/localization

After activating localization for your project and creating the necessary 'strings.xml' files for the languages you want, open Auto Localize. Create a new project. Then, add your project folder, which also contains the localization files, to this project using the 'Add Folder' option. At this point, it's crucial to ensure the accuracy of the 'Default Language' you select in Auto Localize, as the source language for the 'strings.xml' files will be determined based on this field. After adding the folder, Auto Localize will automatically scan all the files and identify the items that need to be localized. You can then press the localization button on the toolbar to automatically localize all the files. After hitting the save button, all your 'strings.xml' files will contain the localized translations.

*IMPORTANT NOTE: Auto Localize does not touch any files in your project other than your 'strings.xml' files. However, it's always recommended to work with backups.

In projects developed with Flutter, localization is typically done through App Resource Bundle (.arb) files. You can find the details of the adjustments you need to make in your project for localization at the link below.

https://docs.flutter.dev/ui/accessibility-and-localization/internationalization

After activating localization for your project and creating the necessary '.arb' files for the languages you desire, open Auto Localize. Create a new project. Then, add your project folder, which also contains the localization files, to this project using the 'Add Folder' option. At this point, it's crucial to ensure the accuracy of the 'Default Language' you select in Auto Localize, as the source language for the '.arb' files will be determined based on this field. After adding the folder, Auto Localize will automatically scan all the files and identify the items that need to be localized. You can then press the localization button on the toolbar to automatically localize all the files. After hitting the save button, all your '.arb' files will contain the localized translations.

*IMPORTANT NOTE: Auto Localize does not touch any files in your project other than your '.arb' files. However, it's always recommended to work with backups.

In projects developed with .NET, localization is typically done through resource files with the ".resx" extension. You can find the details of the adjustments you need to make in your project for localization at the link below.

https://learn.microsoft.com/en-us/dotnet/core/extensions/localization

After activating localization for your project and creating the necessary '.resx' files for the languages you want, open Auto Localize. Create a new project. Then, add your project folder, which also contains the localization files, to this project using the 'Add Folder' option. At this point, it's crucial to ensure the accuracy of the 'Default Language' you select in Auto Localize, as the source language for the '.resx' files will be determined based on this field. After adding the folder, Auto Localize will automatically scan all the files and identify the items that need to be localized. You can then press the localization button on the toolbar to automatically localize all the files. After hitting the save button, all your '.resx' files will contain the localized translations.

*IMPORTANT NOTE: Auto Localize does not touch any files in your project other than your '.resx' files. However, it's always recommended to work with backups.

In projects developed with Unity, localization is typically done through localization files with the ".xliff" extension. You can find the details of the adjustments you need to make in your project for localization at the link below.

https://docs.unity3d.com/Packages/com.unity.localization@1.4/manual/index.html

After activating localization for your project and exporting the necessary '.xliff' files for the languages you want, open Auto Localize. Create a new project. Then, add the folder containing the localization files to this project using the 'Add Folder' option. Alternatively, you can also add individual '.xliff' files using the 'Add Files' option. Auto Localize will automatically scan all the files and identify the items that need to be localized. You can then press the localization button on the toolbar to automatically localize all the files. After hitting the save button, all your '.xliff' files will contain the localized translations. Finally, you can import the localized '.xliff' files back into your project.

Articulate Rise 360 Courses

In this section, it is explained how Auto Localize can be used to translate Articulate Rise 360 Courses. Please click below link.


How to automatically translate Articulate Rise 360 courses


Related Help Center Categories

If you didn’t find what you needed, these could help!

Help

Common questions and answers about the app.

Programming Languages

Detailed info about how Auto Localize can be used to localize applications developed in different programming languages.